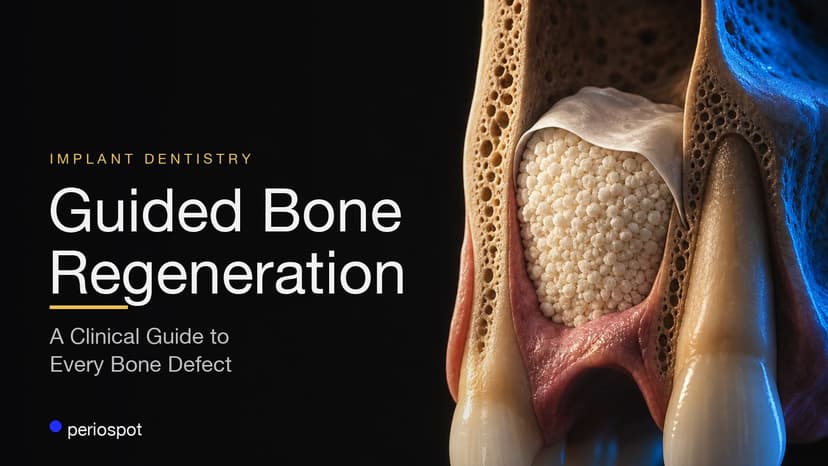
Socket Preservation: The Complete 2026 Guide to Alveolar Ridge Preservation Techniques
Socket preservation technique explained: graft timing, materials, membranes, socket seal options, healing timelines, and ADA code context.


Table of Contents
Related clinical guides
ADA/CDT coding for socket (ridge) preservation. The primary code is D7953, "bone replacement graft for ridge preservation, per site." Bill it when you place graft material in a fresh extraction socket to preserve the ridge. It does not cover a routine extraction without grafting, sinus grafts (D7950), or a graft placed at implant placement (D6104). Barrier membrane or biologic materials may be reported separately when appropriate; choose the membrane code for the clinical site and payer context, for example D4266/D4267 for natural-tooth periodontal GTR, D7956/D7957 for edentulous ridge GTR, or D6106/D6107 around implants. Confirm current CDT and payer policy.
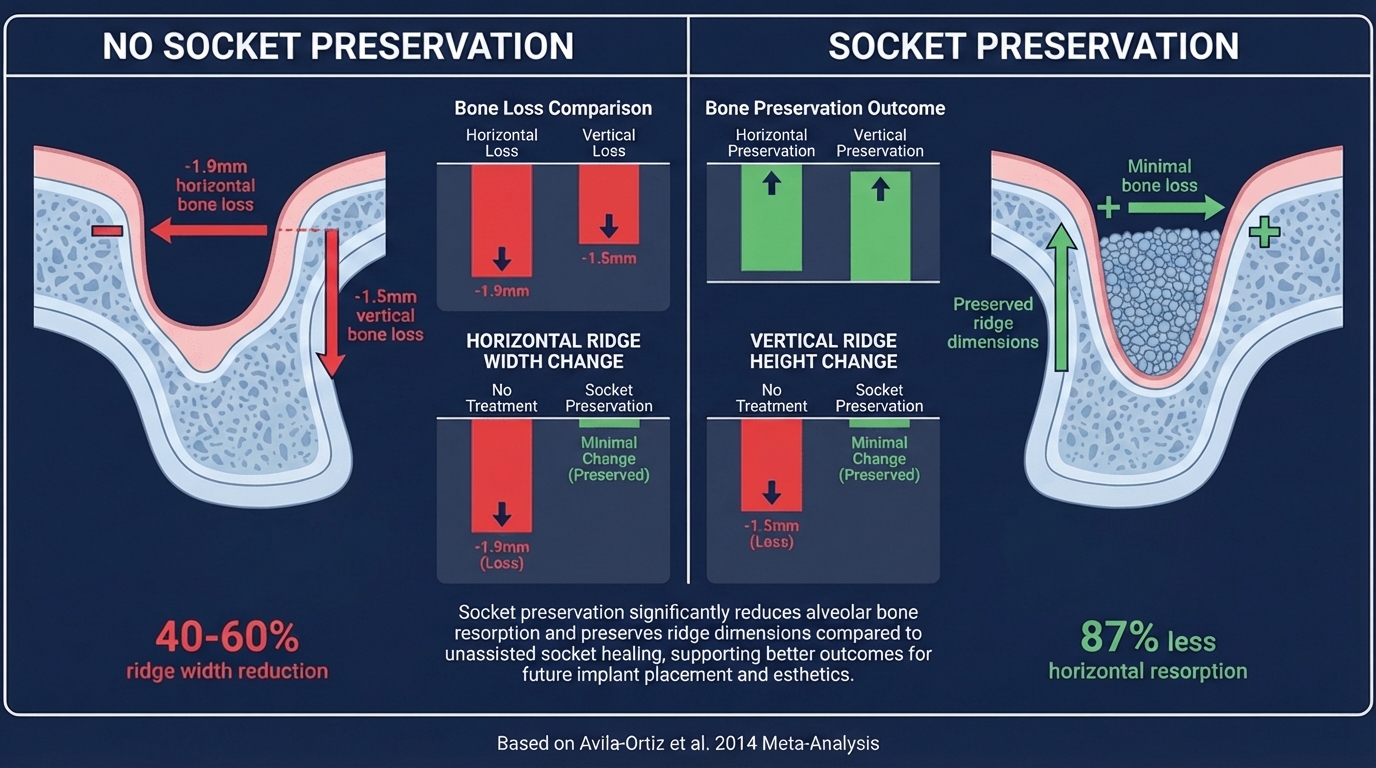
Socket preservation, also called ridge preservation or alveolar ridge preservation, is the grafting and sealing of an extraction socket to limit post-extraction ridge collapse before implant or prosthetic treatment. The largest dimensional changes occur during the first 3-6 months after extraction, and patients can lose 40-60% of ridge width within the first year.
When performed at the time of extraction, socket preservation can reduce the need for later guided bone regeneration, block grafting, or sinus augmentation. This guide covers indications, technique steps, graft and membrane selection, healing timelines, socket seal options, and ADA code context for clinical documentation.
---
The Educational Gap: Why Socket Preservation Is Often Overlooked
Here's something that frustrates me: in many implant dentistry master's programs, socket preservation receives surprisingly little attention. The emphasis falls heavily on reconstruction—guided bone regeneration, block grafts, sinus lifts—all the heroic procedures that fix problems after they occur.
But in periodontology training? We learn to prevent first. The mindset is different. We assume we'll lose the ridge after extraction, so we focus on minimizing that loss rather than accepting it as inevitable.
This educational divide creates a troubling pattern I see repeatedly:
1. Clinician extracts tooth without considering ridge preservation
2. Ridge collapses (as biology dictates it will)
3. Clinician attempts reconstruction with GBR, block grafts, or staged procedures
4. Patient undergoes more invasive surgery than necessary
5. Costs increase, outcomes become less predictable
The irony? A 15-minute socket preservation procedure could have prevented months of additional treatment.
The paradigm shift I'm proposing: We should assume every extraction socket will benefit from preservation—and actively justify not doing it, rather than the reverse.
Understanding What Happens After Tooth Extraction
Before we can preserve the ridge, we need to understand what we're preserving it from.
The moment a tooth is extracted, a complex biological cascade begins. The bundle bone—that thin layer of tooth-dependent alveolar bone that anchors the periodontal ligament fibers—begins to resorb almost immediately. This isn't pathology; it's physiology. The bundle bone exists solely to support the tooth, and without its functional stimulus, the body sees no reason to maintain it.
I've written extensively about this in my article on bundle bone and gap management, but here's the key takeaway: bundle bone resorption is inevitable and largely unpreventable. What we can control is what happens to the surrounding alveolar bone.
The Evidence Is Overwhelming: What the Meta-Analyses Tell Us
The landmark 2014 systematic review by Avila-Ortiz et al. in the Journal of Dental Research analyzed 37 studies and delivered the definitive verdict: socket preservation procedures significantly reduce alveolar bone loss compared to unassisted healing.
The numbers speak for themselves:
- 1.89mm less horizontal bone loss with socket preservation vs. no treatment
- 1.32mm less vertical mid-buccal bone loss
- Weighted mean differences that reach statistical significance across virtually all outcome measures
The 2018 meta-analysis by Romito et al. in the International Journal of Oral and Maxillofacial Implants confirmed these findings across 21 additional studies, reporting effect sizes of 1.86mm for horizontal preservation.
More recent evidence from Suttapreyasri et al. (2025)—using split-mouth randomized controlled trials registered with PROSPERO—continues to demonstrate the superiority of socket preservation. And Elayah et al. (2025) have now provided molar-specific data showing ARP's effectiveness even in posterior sites with complex root anatomy.
The European Federation of Periodontology's 2023 consensus report summarized it best: alveolar ridge preservation should be considered a standard-of-care procedure when implant placement will be delayed.
The Timeline of Ridge Resorption
Research by Schropp et al. and Araújo & Lindhe has given us a clear picture of post-extraction bone remodeling:
| Timeframe | What Happens | Clinical Significance |
|---|---|---|
| 0-2 weeks | Blood clot formation, initial bundle bone resorption | Window for immediate implant placement |
| 2-4 weeks | Woven bone formation, continued buccal plate resorption | Socket preservation most effective |
| 1-3 months | Soft tissue closure, rapid dimensional changes | Critical preservation window |
| 3-6 months | Lamellar bone maturation, ridge contraction | Most volume loss occurs here |
| 6-12 months | Continued remodeling, stabilization | Delayed implant placement window |
The buccal plate—typically only 0.5-1mm thick—is particularly vulnerable. In 87% of extraction sites, the buccal wall is thinner than 1mm, making it prone to complete resorption within months.
For a deeper dive into post-extraction healing dynamics, see my comprehensive article on bone remodeling after tooth extraction.
A Clinical Case: The Central Incisor That Changed My Approach
Let me share a case that exemplifies why I'm so passionate about socket preservation.
A patient presented with a central incisor requiring extraction—but here's what made this case particularly challenging:
- Thin biotype with highly scalloped gingival architecture
- Compromised buccal plate visible on CBCT
- High esthetic expectations (the patient was a professional in a public-facing role)
- Limited budget that precluded immediate implant placement
The conventional approach would have been: extract, wait 3-6 months, assess the damage, and then attempt reconstruction with GBR. Given the thin biotype, I knew we'd be looking at significant horizontal collapse requiring staged bone augmentation—more surgery, more time, more expense, less predictability.
Instead, I chose socket preservation with a xenograft and PRF membrane.
The Clinical Sequence
Step 1: Atraumatic Extraction
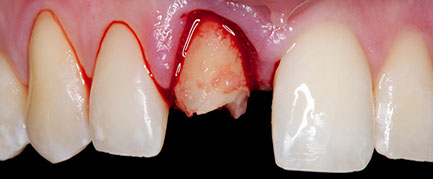
The extraction itself took 25 minutes—longer than many surgeons would consider reasonable. But every second invested in preserving the buccal plate pays dividends later. Periotomes, physics forceps, and patience were my instruments of choice.
Step 2: Socket Assessment
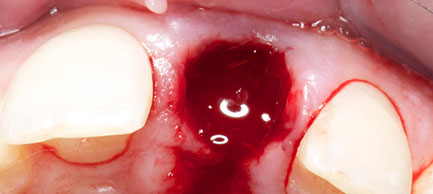
After extraction, I assessed all four walls. The buccal plate was intact—thin, yes, but intact. This confirmed my decision to proceed with socket preservation rather than immediate placement.
Step 3: Socket Management

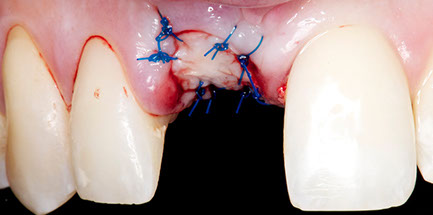
Thorough debridement followed by placement of deproteinized bovine bone mineral (Bio-Oss) mixed with PRF exudate. The graft was packed incrementally, filling to approximately 1-2mm below the alveolar crest.
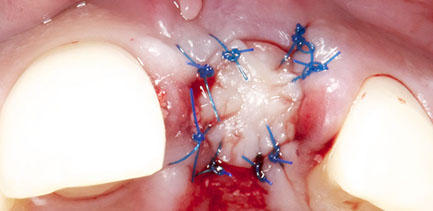
Step 4: Initial Closure
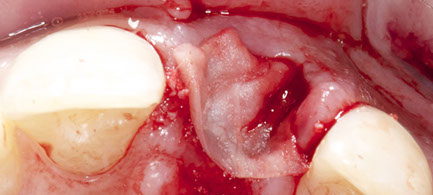
A PRF membrane provided the biologic seal. No flap advancement was needed—the soft tissue was approximated with cross-mattress sutures.
Step 5: Early Healing
At two weeks, epithelialization was progressing well. The ridge contour was maintained—no visible collapse despite the challenging biotype.
Step 6: Soft Tissue Maturation
By six weeks, the soft tissue had matured beautifully. The scalloped architecture that we started with? Preserved.
The Result: Preserved Ridge Ready for Implant
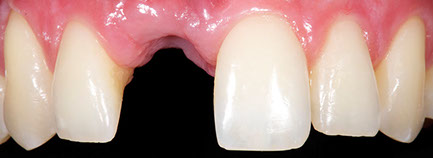
At six months, the ridge dimensions were maintained. The implant placement that followed was straightforward—no additional bone grafting required, no staged procedures, no heroic reconstruction.
The lesson? A 15-minute socket preservation procedure saved this patient from what would have been months of complex reconstruction. The biology worked with us because we worked with the biology.
For more detail on healing timelines, see my dedicated article: How much time do I have to wait after an alveolar ridge preservation?
When Is Socket Preservation Indicated?
Not every extraction requires socket preservation. The key is matching your intervention to the patient's treatment plan and anatomical presentation.
Strong Indications for Socket Preservation
1. Delayed Implant Placement (4-6 months)
When implant placement must be delayed—whether for medical reasons, financial constraints, or treatment sequencing—socket preservation becomes essential to maintain ridge dimensions.
2. Thin Buccal Plate (<1mm)
Sites with thin buccal walls will predictably lose significant horizontal dimension without intervention. These are your highest-yield socket preservation cases.
3. Esthetic Zone
Anterior sites demand meticulous ridge preservation. Even 1mm of buccal recession can compromise the final esthetic outcome. The pink esthetic score depends heavily on the underlying bone architecture.
4. Multiple Adjacent Extractions
When extracting multiple adjacent teeth, the cumulative ridge collapse can be devastating. Socket preservation maintains the overall arch form and simplifies future prosthetic planning.
5. Patient Cannot Afford Immediate Implant
Real-world economics often dictate our treatment timing. Socket preservation is a cost-effective way to preserve future options when immediate implants aren't financially feasible.
Relative Contraindications
- Immediate implant placement is planned and achievable
- Severe periapical pathology requiring open healing (though some evidence supports grafting even in infected sites)
- Compromised healing capacity (uncontrolled diabetes, radiation therapy, bisphosphonate use requiring careful evaluation)
- Sites where future implant placement is not planned
The Decision Framework
I use a simple algorithm in my practice:
1. Can I place an immediate implant with good primary stability? → Consider immediate placement
2. Is the buccal plate intact and >1mm thick? → May not need aggressive preservation
3. Will implant placement be delayed >8 weeks? → Socket preservation indicated
4. Is this an esthetic zone case? → Socket preservation almost always indicated
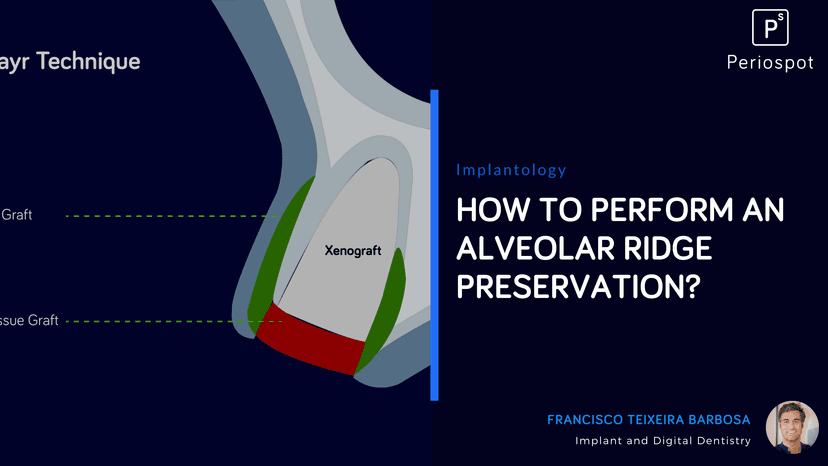
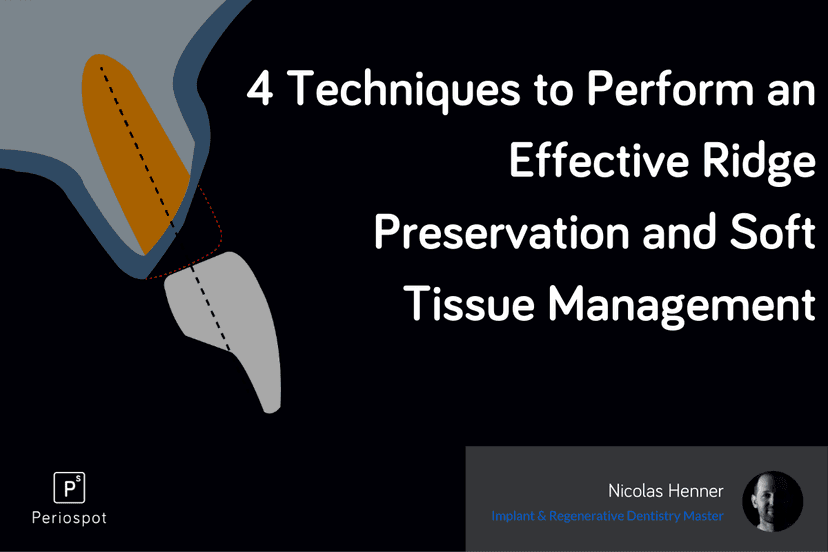
For more detailed technique selection guidance, see my article on 4 techniques for effective ridge preservation.
Socket Preservation Materials: Making the Right Choice
The materials you choose for socket preservation can significantly impact your outcomes. Here's my evidence-based approach to material selection.
Bone Graft Materials
Xenografts (Bovine-Derived)
Deproteinized bovine bone mineral (DBBM) like Bio-Oss® remains the gold standard for socket preservation. Its slow resorption rate (maintaining space for 6-12+ months) and excellent osteoconductive properties make it ideal for delayed implant cases.
Clinical tip: I use Bio-Oss Collagen® in most cases—the collagen binder prevents particle migration and simplifies placement.
Allografts
Freeze-dried bone allograft (FDBA) and demineralized freeze-dried bone allograft (DFDBA) offer faster remodeling than xenografts. I prefer these when implant placement is planned for 4-5 months post-extraction.
Alloplasts
Synthetic materials like biphasic calcium phosphate (BCP) and bioactive glasses are viable alternatives for patients who prefer to avoid animal or human-derived products. Their results are comparable in many studies.
Autogenous Bone
While autogenous bone remains the "gold standard" for osteogenic potential, I rarely use it for socket preservation alone—the donor site morbidity isn't justified for this indication.
Membranes and Socket Seals
The debate over whether to use a membrane—and which type—continues in the literature. Here's my approach:
Collagen Membranes (Resorbable)
Bio-Gide®, Geistlich Mucograft®, and similar collagen membranes provide excellent soft tissue healing while protecting the graft. These are my go-to for most cases.
d-PTFE Membranes
Dense PTFE membranes allow intentional exposure without bacterial colonization. Excellent for cases where primary closure isn't achievable, though they require a second procedure for removal.
Collagen Plugs/Sponges
For simpler cases or when cost is a concern, a collagen plug (like CollaTape®) provides basic wound protection while allowing secondary epithelialization.
No Membrane (Graft Alone)
Some evidence supports using DBBM alone without a membrane. The granules' stability and the overlying blood clot provide adequate protection in select cases.
Platelet Concentrates: PRF and PRGF
Leukocyte-platelet-rich fibrin (L-PRF) and plasma rich in growth factors (PRGF) have transformed my socket preservation protocol. The growth factors (PDGF, TGF-β, VEGF) accelerate soft tissue healing and may enhance bone regeneration.
My current protocol incorporates PRF membranes as a biologic seal over the socket, often eliminating the need for synthetic membranes.
The work by Elayah et al. (2023) in Frontiers in Endocrinology demonstrated that concentrated growth factors (CGF) can further enhance socket healing outcomes, particularly in metabolically challenged patients.
Step-by-Step Socket Preservation Procedure
Here's my evidence-based approach to socket preservation, refined over thousands of cases.
Pre-Operative Planning
1. Radiographic assessment – CBCT when possible to evaluate buccal plate thickness and socket anatomy
2. Medical history review – Identify healing risk factors
3. Patient counseling – Set realistic expectations for healing timeline and future implant placement
Surgical Protocol
Step 1: Atraumatic Extraction
This is perhaps the most critical step. Use periotomes, physics forceps, or piezosurgery to minimize trauma to the buccal plate. Every millimeter of crestal bone preserved is a millimeter you won't need to regenerate later. The importance of maintaining ridge dimensions for optimal implant positioning cannot be overstated.
My approach: I spend more time on extraction technique than on the grafting itself. A careful 20-minute extraction beats a rushed 5-minute one every time.
Step 2: Socket Debridement
Thoroughly curette the socket walls to remove granulation tissue and stimulate bleeding. This creates the optimal environment for graft incorporation.
Step 3: Assess Socket Walls
Examine all four walls for dehiscences or fenestrations. Document your findings—they'll guide membrane selection and prognosis discussion.
Step 4: Graft Placement
Hydrate your bone graft material (I use patient's blood or PRF exudate). Pack the graft incrementally, condensing gently without over-packing. Fill to approximately 1-2mm below the alveolar crest—not flush with it.
Step 5: Membrane/Seal Application
Apply your chosen membrane over the graft. For collagen membranes, I typically extend 2-3mm beyond the socket margins onto the surrounding bone.
Step 6: Soft Tissue Management
This step varies based on your technique choice. Options include:
- Primary closure with advancement flap
- Partial closure with cross-mattress sutures
- Secondary intention healing under a collagen plug
- Socket seal using a connective tissue graft
For detailed techniques, see my comprehensive article on how to perform alveolar ridge preservation.
Post-Operative Protocol
- Chlorhexidine rinse 0.12% twice daily for 2 weeks
- Soft diet for 1 week
- Avoid smoking (critical for healing)
- Antibiotics: I prescribe Amoxicillin 500mg TID for 5-7 days in most cases
- Follow-up at 1-2 weeks to assess healing
Socket Preservation Techniques Compared
Four primary soft tissue management approaches dominate the literature. Each has its place depending on keratinized tissue availability, socket morphology, and case complexity.
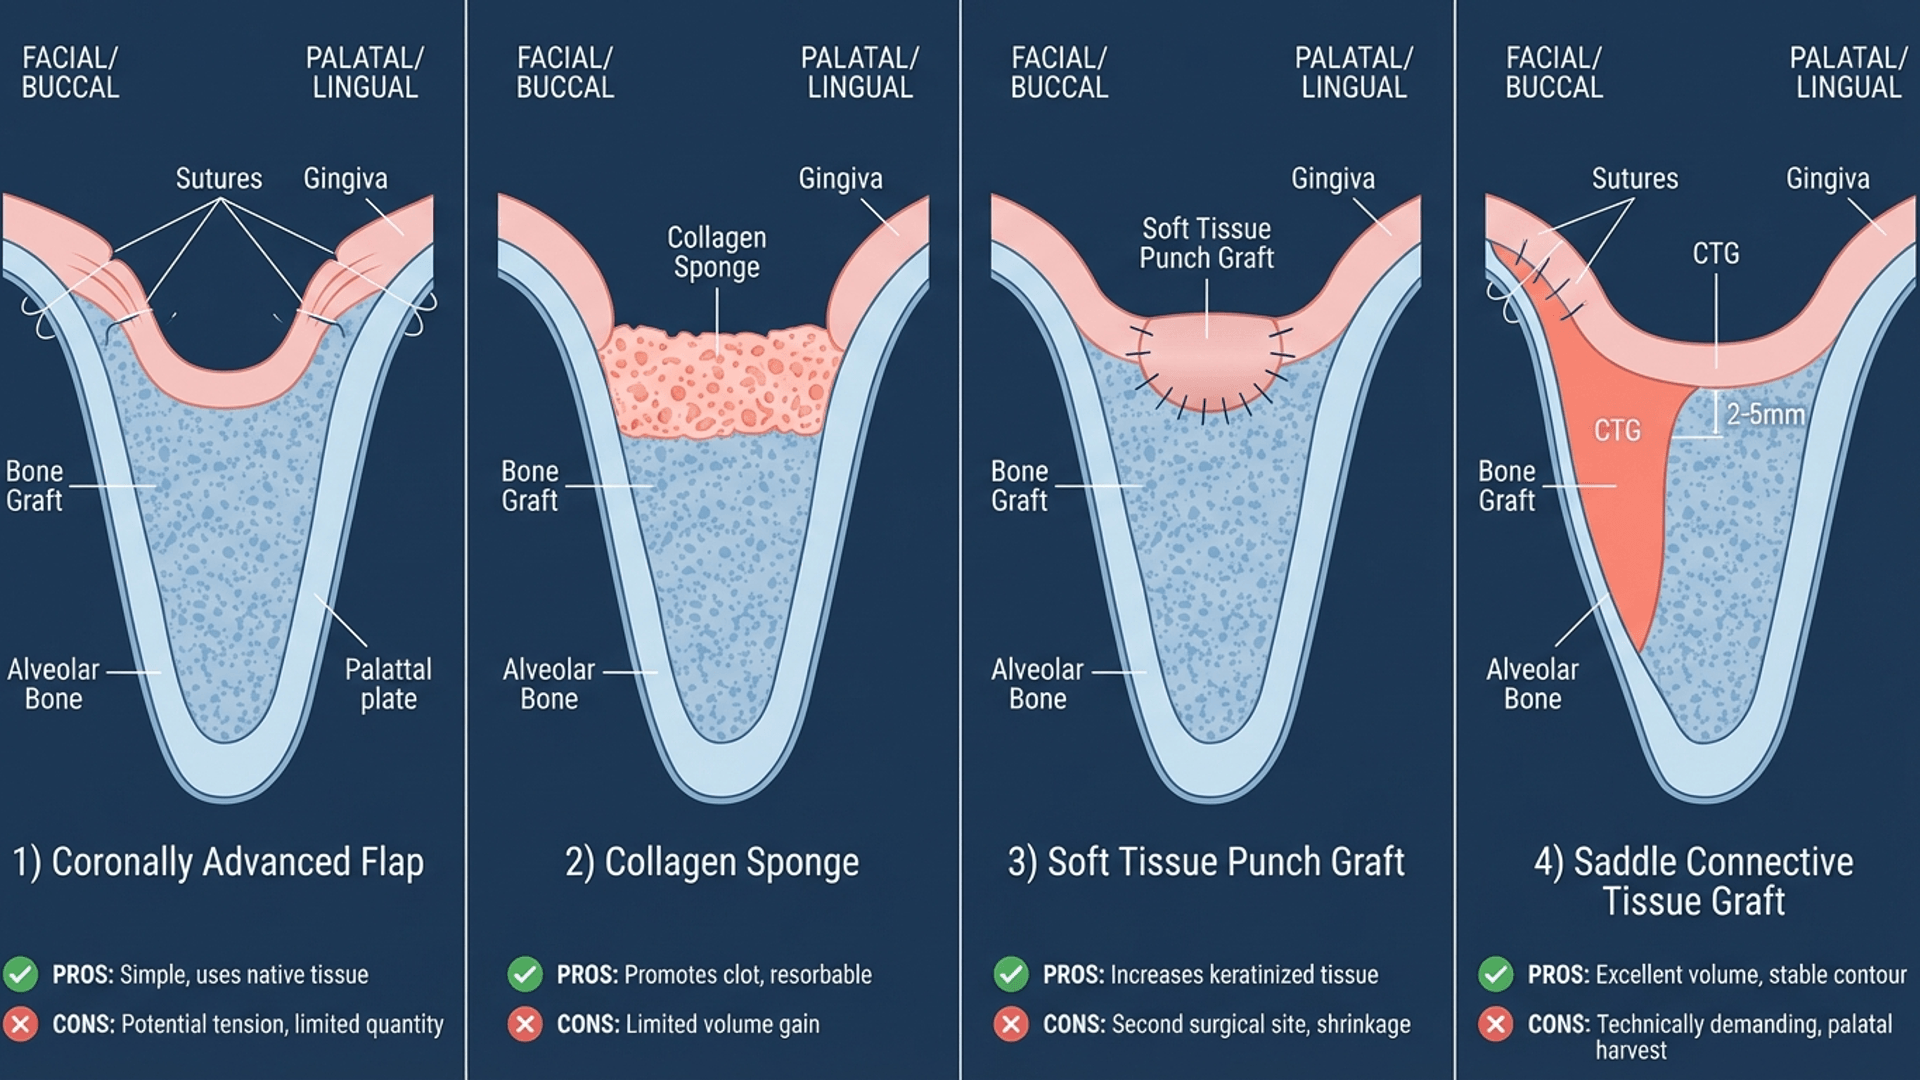
Technique Comparison
| Technique | Best For | Advantages | Disadvantages |
|---|---|---|---|
| Coronally Advanced Flap (CAF) | Adequate KT, esthetic sites | Complete primary closure | Reduces vestibular depth, technique-sensitive |
| Collagen Sponge/Plug | Simple cases, posterior sites | Easy, no flap advancement | Secondary healing, slower closure |
| Soft Tissue Punch Graft | Limited KT, maintains vestibule | Preserves KT and vestibule | Requires palatal donor site |
| Saddle CTG | Esthetic zone, pontic sites | Excellent tissue quality, ovate pontic option | Most invasive, technique-sensitive |
Recent Evidence: Flapless vs. Flapped Approaches
The 2018 systematic review by Lee et al. compared flapless versus flapped socket preservation techniques and found comparable outcomes for ridge preservation—but with significantly less patient morbidity in flapless approaches. This supports my preference for minimally invasive techniques whenever anatomically feasible.
Additionally, a 2025 RCT on socket sealing with free gingival grafts demonstrated excellent outcomes for maintaining keratinized tissue width while simultaneously preserving the alveolar ridge—a win-win that addresses two common concerns simultaneously.
My Technique Preferences by Scenario
Posterior Molar Sites: Collagen plug with Bio-Oss—simple, predictable, minimal intervention.
Anterior Esthetic Zone: Saddle connective tissue graft with xenograft—maximum ridge preservation and soft tissue optimization.
Limited Keratinized Tissue: Soft tissue punch graft to maintain vestibular depth while providing primary closure.
Standard Premolar Sites: Cross-mattress suture technique over collagen membrane—balances simplicity with predictability.
The Socket Shield Technique: A Paradigm Shift
The socket shield technique represents a fundamental shift in our approach to ridge preservation—instead of filling the socket with graft material, we preserve a portion of the root itself.
By maintaining the buccal root segment in situ, we preserve the bundle bone and periodontal ligament in their native position. The physiologic stimulus for bone maintenance remains intact.
I've documented a detailed case using this technique in my article on the socket shield technique, which includes step-by-step clinical photos and follow-up radiographs.
Socket Shield Indications
- Immediate implant placement in esthetic zone
- Thin buccal plate where traditional preservation may fail
- Cases where maximum facial contour maintenance is critical
Socket Shield Contraindications
- Root pathology (resorption, fracture, caries)
- Periapical infection
- Inexperienced clinicians (steep learning curve)
Healing Timeline and When to Place the Implant
One of the most common questions I receive: "How long should I wait after socket preservation to place the implant?"
The answer depends on your graft material and clinical findings, but here's a general framework:
Expected Healing Timeline
| Phase | Timeframe | Clinical Findings |
|---|---|---|
| Soft tissue closure | 2-4 weeks | Complete epithelialization over graft |
| Initial mineralization | 6-8 weeks | Graft beginning to integrate |
| Graft maturation | 4-6 months | Dense, probing-resistant bone fill |
| Optimal implant placement | 4-6 months | Stable ridge dimensions, quality bone |
For xenografts (Bio-Oss): Wait 6 months minimum. These materials resorb slowly and need time to incorporate.
For allografts (FDBA/DFDBA): 4-5 months is typically adequate.
For autogenous bone or synthetics: 3-4 months may be sufficient.
Clinical Assessment Before Implant Placement
Before scheduling implant surgery, I evaluate:
1. Clinical probing – Is the graft firm and integrated?
2. CBCT imaging – Assess ridge dimensions and bone density
3. Soft tissue quality – Adequate keratinized tissue present?
4. Ridge contour – Is additional grafting needed?
Common Complications and How to Avoid Them
I'll be honest—I've encountered every complication in this section at some point in my career. Here's what I've learned:
1. Graft Exposure and Particle Loss
Prevention:
- Achieve tension-free closure when possible
- Use d-PTFE if primary closure isn't achievable
- PRF membranes create an excellent biologic seal
Management:
- Minor exposure: chlorhexidine rinse, observation
- Significant exposure: may need to debride and allow secondary healing
2. Infection
Prevention:
- Thorough socket debridement
- Appropriate antibiotic coverage
- Patient compliance with post-op instructions
Management:
- Antibiotics (if not already prescribed)
- Consider graft removal if severe
- Most mild infections resolve with conservative management
3. Inadequate Ridge Preservation
Prevention:
- Proper graft condensation
- Membrane stabilization
- Protect site from trauma during healing
Management:
- Additional grafting may be needed at implant placement
- Consider GBR techniques if significant deficiency
4. Soft Tissue Complications
Prevention:
- Atraumatic flap handling
- Appropriate suture technique
- Realistic assessment of tissue advancement
Management:
- Usually self-limiting
- May affect vestibular depth long-term
Socket Preservation Billing and ADA Codes
Understanding the proper coding for socket preservation ensures appropriate reimbursement and documentation.
Primary Code: D7953
D7953 – Bone replacement graft for ridge preservation – per site
This is your primary code for socket preservation procedures. It covers:
- Bone graft material placement
- Site preparation
- Basic wound closure
Documentation requirements:
- Indication for procedure
- Graft material used
- Membrane type (if applicable)
- Photographic documentation recommended
Additional Codes to Consider
| Code | Description | When to Use |
|---|---|---|
| D4266 | Guided tissue regeneration – resorbable barrier, per site | When using collagen membrane |
| D4267 | Guided tissue regeneration – non-resorbable barrier, per site | When using d-PTFE |
| D7921 | Collection and application of autologous blood concentrate | For PRF/PRGF |
| D4273 | Autogenous connective tissue graft | When using saddle CTG technique |
Insurance Considerations
Most dental insurance plans have limited or no coverage for socket preservation, classifying it as a "pre-prosthetic" procedure. I recommend:
1. Pre-authorization when possible
2. Clear documentation of medical necessity
3. Narrative explaining how the procedure prevents more extensive (and expensive) future treatment
Building Your Socket Preservation Library
I'm frequently asked for book recommendations to deepen understanding of ridge preservation and related surgical techniques. Here are my top picks:
Essential Reading
Key Takeaways: The Prevention Mindset
Socket preservation is not merely a procedure—it's a philosophy of maintaining what nature gave us rather than attempting to reconstruct what we've lost. Here are the principles that guide my practice:
1. Atraumatic extraction is 80% of success. Invest time in careful extraction technique.
2. Match materials to timeline. Xenografts for longer healing, allografts for quicker turnaround.
3. Soft tissue management matters. A beautiful graft under poorly managed soft tissue will fail.
4. Think ahead. Every extraction should be planned with the final restoration in mind.
5. Document everything. Good records protect you and improve your future treatment planning.
6. Prevention beats reconstruction. The best bone graft is the one you don't need—because you preserved what was already there.
7. Understand the biological foundations. Socket preservation exists within a broader context of bone biology. For the science behind crestal bone maintenance, see Prof. Linkevičius’s zero bone loss concepts. And for the fundamental process that makes implant therapy possible, revisit the principles of osseointegration.
Socket preservation has become one of the most predictable procedures in implant dentistry. With proper technique, material selection, and case selection, you can consistently maintain ridge dimensions and set the stage for ideal implant placement.
Remember the AI analogy: In 2026, denying the value of socket preservation is as outdated as denying the value of AI in clinical practice. The evidence is overwhelming. The techniques are refined. The outcomes are predictable.
The only question is: will you preserve, or will you reconstruct?
---
Have questions about socket preservation? Drop me a comment below or reach out on LinkedIn. I read every message and love discussing clinical cases with colleagues worldwide.
Looking for visual aids to explain socket preservation to patients or colleagues? Check out our Alveolar Ridge Preservation Speaker Pack with ready-to-use animations and slides.
---
References
Avila-Ortiz G, Elangovan S, Kramer KW, Zander D, Wallace SC. Effect of alveolar ridge preservation after tooth extraction: a systematic review and meta-analysis. J Dent Res. 2014;93(10):950-958. doi:10.1177/0022034514541241
Romito GA, Camargo PM, Halperin-Sternfeld M. Systematic review and meta-analysis of alveolar ridge preservation in sites with implant placement. Int J Oral Maxillofac Implants. 2018;33(4):875-892.
Araújo MG, Lindhe J. Dimensional ridge alterations following tooth extraction. An experimental study in the dog. J Clin Periodontol. 2005;32(2):212-218.
Schropp L, Wenzel A, Kostopoulos L, Karring T. Bone healing and soft tissue contour changes following single-tooth extraction: a clinical and radiographic 12-month prospective study. Int J Periodontics Restorative Dent. 2003;23(4):313-323.
Lee CT, Chiu TS, Chuang SK, Schwarz F, Now D. Flapless versus flapped socket preservation techniques: a systematic review. J Clin Periodontol. 2018;45(5):582-590.
Elayah SA, et al. Concentrated growth factors for socket preservation: a randomized controlled trial. Front Endocrinol. 2023;14:1205468.
European Federation of Periodontology. EFP S3-Level Clinical Practice Guideline on the Treatment of Stage I–III Periodontitis. 2023.
Check Your Knowledge
Comments
0 totalLoading comments...
Previous
Osseointegration: The Stuff That Actually Makes Dental Implants Work (And Why You Should Care)
Next
Tuminha's Library 2026: 20 Books That Changed How I Think (None About Teeth)