Dental Photography Equipment for Dentists: Camera, Lens, Flash
A concise dental photography equipment checklist for dentists: camera body, macro lens, ring or twin flash, mirrors, retractors, contrastors, and starter settings.


Table of Contents
Dental photography equipment checklist for dentists
Short answer: a practical dental photography kit needs a camera body with manual controls, a macro lens, a ring or twin flash, cheek retractors, intraoral mirrors, contrastors, and a simple storage/editing workflow.
| Item | What to buy first | Why it matters |
|---|---|---|
| Camera body | DSLR or mirrorless body with manual exposure and RAW | Manual control makes case photos repeatable. |
| Macro lens | 90-105 mm macro lens | Gives close-up detail without distorting teeth. |
| Flash | Ring flash for simplicity or twin flash for more texture | Controls shadows inside the mouth. |
| Retractors and mirrors | Autoclavable retractors plus occlusal and lateral mirrors | Creates clear intraoral views without lips or cheeks blocking the image. |
| Contrastors | Black contrastors for anterior photos | Separates the teeth from the background. |
| Workflow | Lightroom, Photos, or another organized library | Keeps clinical photos findable, backed up, and ready for communication. |
Starter camera settings for dental photography
| Use case | Starting point | Adjustment |
|---|---|---|
| Intraoral images | ISO 100, f/22, 1/125-1/200 s, manual flash | Increase or reduce flash power before changing aperture. |
| Extraoral portraits | ISO 100-400, f/8-f/11, 1/125 s | Use softer light and keep the background consistent. |
| Shade documentation | RAW, fixed white balance, shade tab visible | Keep the tab and teeth in the same plane of focus. |
For the full clinical workflow, including framing and documentation strategy, read the main dental photography guide.
Camera body
My camera is a Nikon 610. Full frame and it is also the camera that I used to do the video that was on the page about Dental Photography.
Macro lens
I only use the original Nikon lens. Of course, there are less expensive lens (Tamron, Sigma etc) but for me, the lens is even more important than the camera in itself. A macro 105 mm does a great job when we are talking about dental photography.
Flash
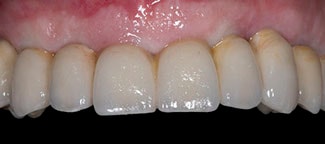
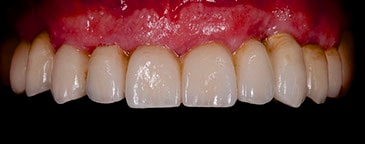
Ring flash or twins flash. Lately, I´m using the R1C1 and very happy with the result. You can see the difference in this clinical case.
Diffusers and bouncers
A cheap solution that will provide a nice final touch to your dental photos. Try it!
Editing and storage software for dental photography
For software, think less about the brand and more about the workflow: import, correct white balance, keep originals backed up, and export a clean version for communication. You can also read this post about keeping photos available and shareable in a dental practice.
Comments
0 totalLoading comments...
Previous
3 Simple Steps to keep all your Photos Avalaible and Shareable in a Dental Practice
Next
How to learn Periodontal Surgery with an App
Related Articles
A 6-mm Implant Is Not a Shortcut: What 10 Years of Evidence Actually Show
19 min read
25 years of implant follow-up: 94 percent survived, 14 percent met the health definition
13 min read