How I Built a Dental Education Video With Claude Code, Codex, Remotion and HyperFrames


Table of Contents
I do not think dentists need another generic AI-tools list. We have enough of those.
What we need is a repeatable way to take something we already understand clinically, like osseointegration, and turn it into a short patient-friendly video without spending the week inside Final Cut, Premiere or CapCut.
That is what I was testing here: a 9:16 PerioSpot-style explainer about implant integration, built with an AI coding agent, browser-rendered motion graphics, generated clinical images, captions, music ducking and a lot of human quality control.
The important part is not that the first render was good. It was not. The important part is that the workflow became editable. Every bad cut, every orphan frame, every overused B-roll section and every caption timing problem could be described, fixed and rendered again.
That is the AI dental video workflow I would use again: source material, agent brief, visual assets, motion system, audio and a final clinical QA pass.
The idea
The concept was simple: explain osseointegration over time in a way a patient can understand.
Instead of a static diagram, I wanted a vertical video with three layers:
- My face, because trust still matters.
- Clean scientific motion graphics: the stability dip, the bone-to-implant contact sequence, remodeling phases and clinical labels.
- Editing polish: karaoke captions, logo overlays, whooshes, music ducking, B-roll and fast cuts when the voiceover pauses.
In a normal video editor, this becomes a timeline problem. In an agentic workflow, it becomes a specification problem. You are no longer dragging clips around; you are telling the agent what should happen at each second and forcing it to prove the result with screenshots and renders.
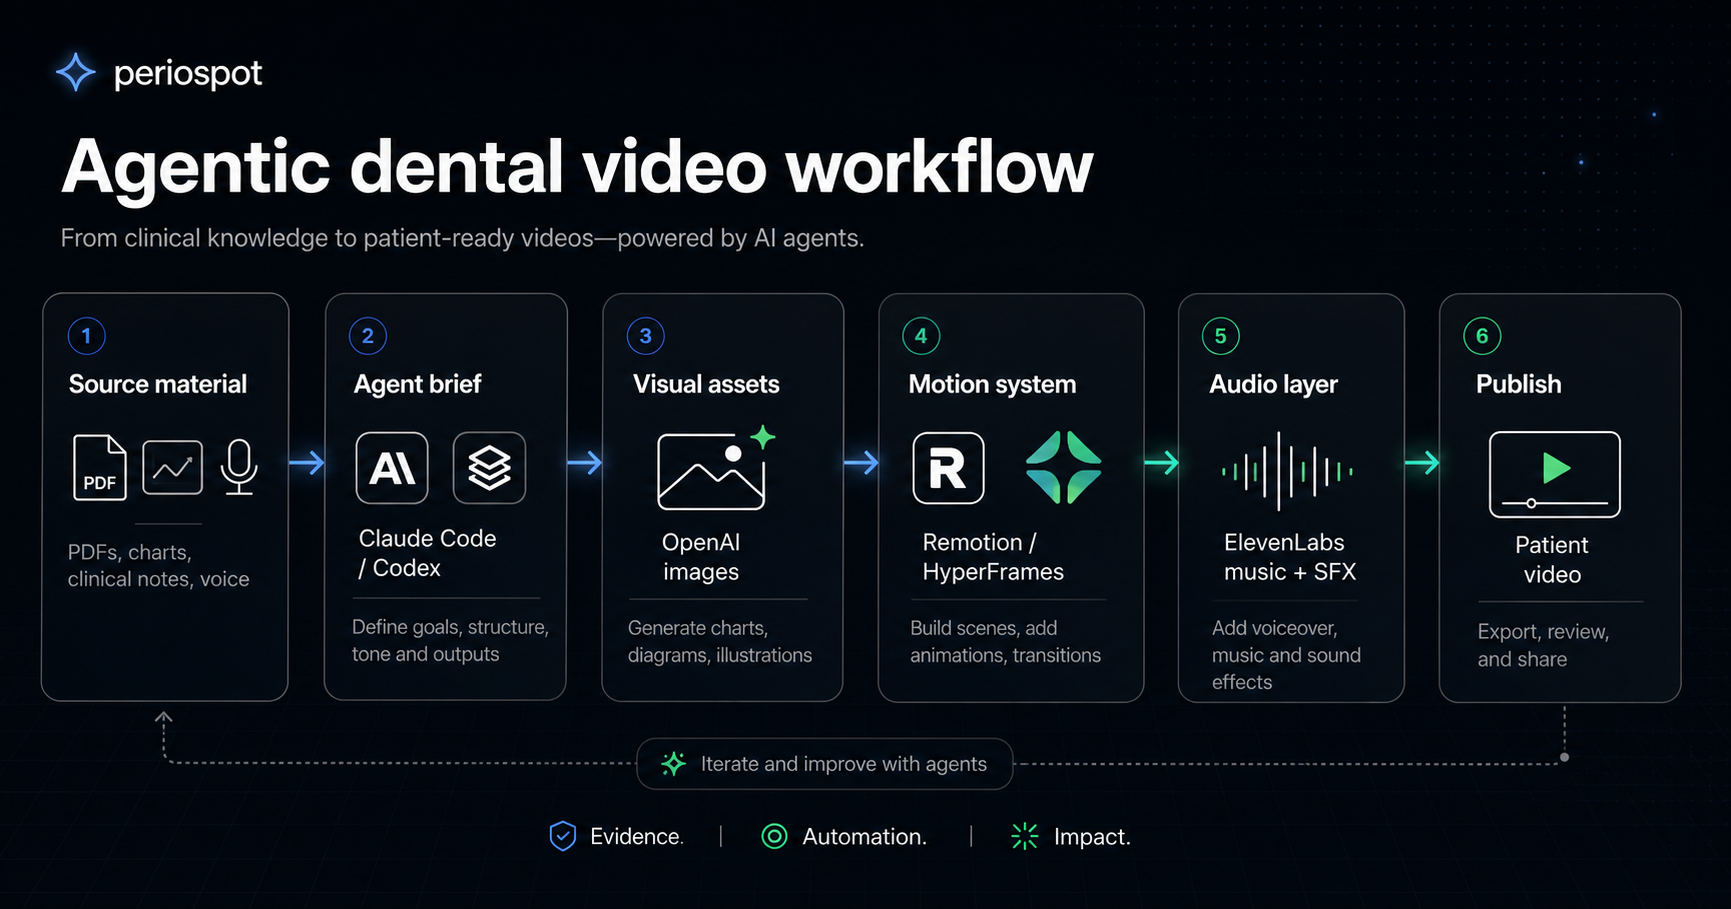
The stack I used
There are many ways to do this. This was the stack that made sense for this experiment.
1. Claude Code or Codex for the agent loop
I used AI coding agents as the production assistant. The agent reads the source material, edits the Remotion composition, trims clips, creates the graphic scenes, runs renders and checks the output.
The practical lesson: do not ask the agent to make a beautiful video in one prompt. Ask it to build a system, then make it inspect the system.
2. Remotion for the video composition
Remotion is useful because the video is React code. That means the graphics, captions, overlays and timing are all explicit. If a chart sits too high, you change a number. If the caption is late, you adjust the cue. If a B-roll frame flashes for a quarter of a second, you remove that scene.
That is much easier for an agent to manipulate than a closed video-editor timeline.
3. HyperFrames for the browser-to-video mindset
HyperFrames from HeyGen is the same general idea taken to its logical extreme: write HTML, render video, make it agent-friendly.
The HyperFrames prompt guide is useful even if you are using Remotion, because it pushes you to describe the video like a production brief: composition, timing, typography, motion, assets, render checks and iteration rules.
For this kind of dental video, that is exactly the right mental model.
4. OpenAI for image generation and visual assets
The osseointegration strip needed to show the same implant over time, not six unrelated AI images. The trick is to generate or choose one strong base image, then use image-to-image edits for the stages.
For example:
- BIC 0%: implant placed, no bone contact.
- BIC 18%: early clot and inflammatory response.
- BIC 36%: woven bone begins to bridge.
- BIC 54%: more organized contact.
- BIC 72%: remodeling continues.
- BIC 90%: mature lamellar bone around the implant.
The point is not to claim exact patient biology from a graphic. The point is to create a consistent visual metaphor that helps the patient understand change over time.
5. ElevenLabs for music, voice and sound effects
The first version of the video felt flat because the audio layer was too passive. A short educational video needs audio motion too.
I used ElevenLabs for three things. Disclosure: this is an affiliate link, but I am including it here because audio was one of the real differences between the flat version and the version that started to feel alive:
- A background track that feels energetic but not cheesy.
- Short whooshes, ticks and blink sounds when logos, miniatures or graphic cards appear.
- Music ducking: lower when I am speaking, higher during silent visual-only moments.
This matters more than people think. A good motion graphic without sound often feels unfinished.
6. Optional B-roll generation
If the source footage is not enough, tools like Runway can generate supporting B-roll. I would keep that secondary. For clinical education, the main asset should still be the idea, the chart, the patient explanation and the clinician on camera.
The prompt that worked better
This is close to the prompt I would use now if I were starting again.
You are editing a vertical PerioSpot educational video for dentists and patients.

Goal:
Create a 9:16 short video explaining osseointegration over time from a clinician's voice recording and source material.

Style:
- Dark PerioSpot visual system
- Bariol-style rounded typography if available
- Clean scientific charts, not generic AI graphics
- Face-first editing: return to the speaker often
- No orphan frames, no quarter-second accidental screens
- Karaoke captions timed word-by-word
- Music ducked under speech and raised during silent visual moments
- Varied whoosh/tick/blink effects for logo and graphic entrances

Source material:
- Voice/video clip of Francisco speaking to camera
- Article/PDF or notes about osseointegration
- Stability dip chart concept
- Generated implant/bone image sequence
- Logos for Claude Code, Codex, OpenAI, ElevenLabs, Remotion and HyperFrames

Tasks:
1. Inspect all footage and create an edit decision list.
2. Remove false takes, long silences, repeated words and moments where the speaker is looking down before talking.
3. Build a Remotion composition at 1080x1920, 30 fps.
4. Create scenes for:
   - Hook with large readable tool logos
   - API/tool stack card
   - Stability dip chart centered on screen
   - Osseointegration image sequence framed with an overlay, not cropped
   - Motion system graphic
   - PDF-to-video workflow graphic
   - Claude Code/Codex working reveal
5. Intercut B-roll with the speaker. Do not leave any static screen on for too long.
6. Add karaoke captions and verify they are readable on mobile.
7. Add music, ducking and varied sound effects.
8. Render checkpoint screenshots at 0:05, 0:20, 0:40, 0:51, 1:03 and 1:18 before final export.
9. After rendering, run ffprobe and produce a QA report with duration, resolution, audio streams and known issues.
That prompt is long because the job is long. If you only say "make it dynamic", the agent will guess. If you say exactly where the video is failing, it can fix the timeline.
The QA loop is the real workflow
The first renders had predictable problems.
The stability dip chart was too high. The generated image sequence was cropped by a rectangle that should have framed it. Some B-roll appeared for less than a second, which felt like a mistake. A few cuts started while I was looking down. Some text overlays were too transparent. The same whoosh sound repeated too often. And the final words were slightly cut.
That is not failure. That is the edit list.
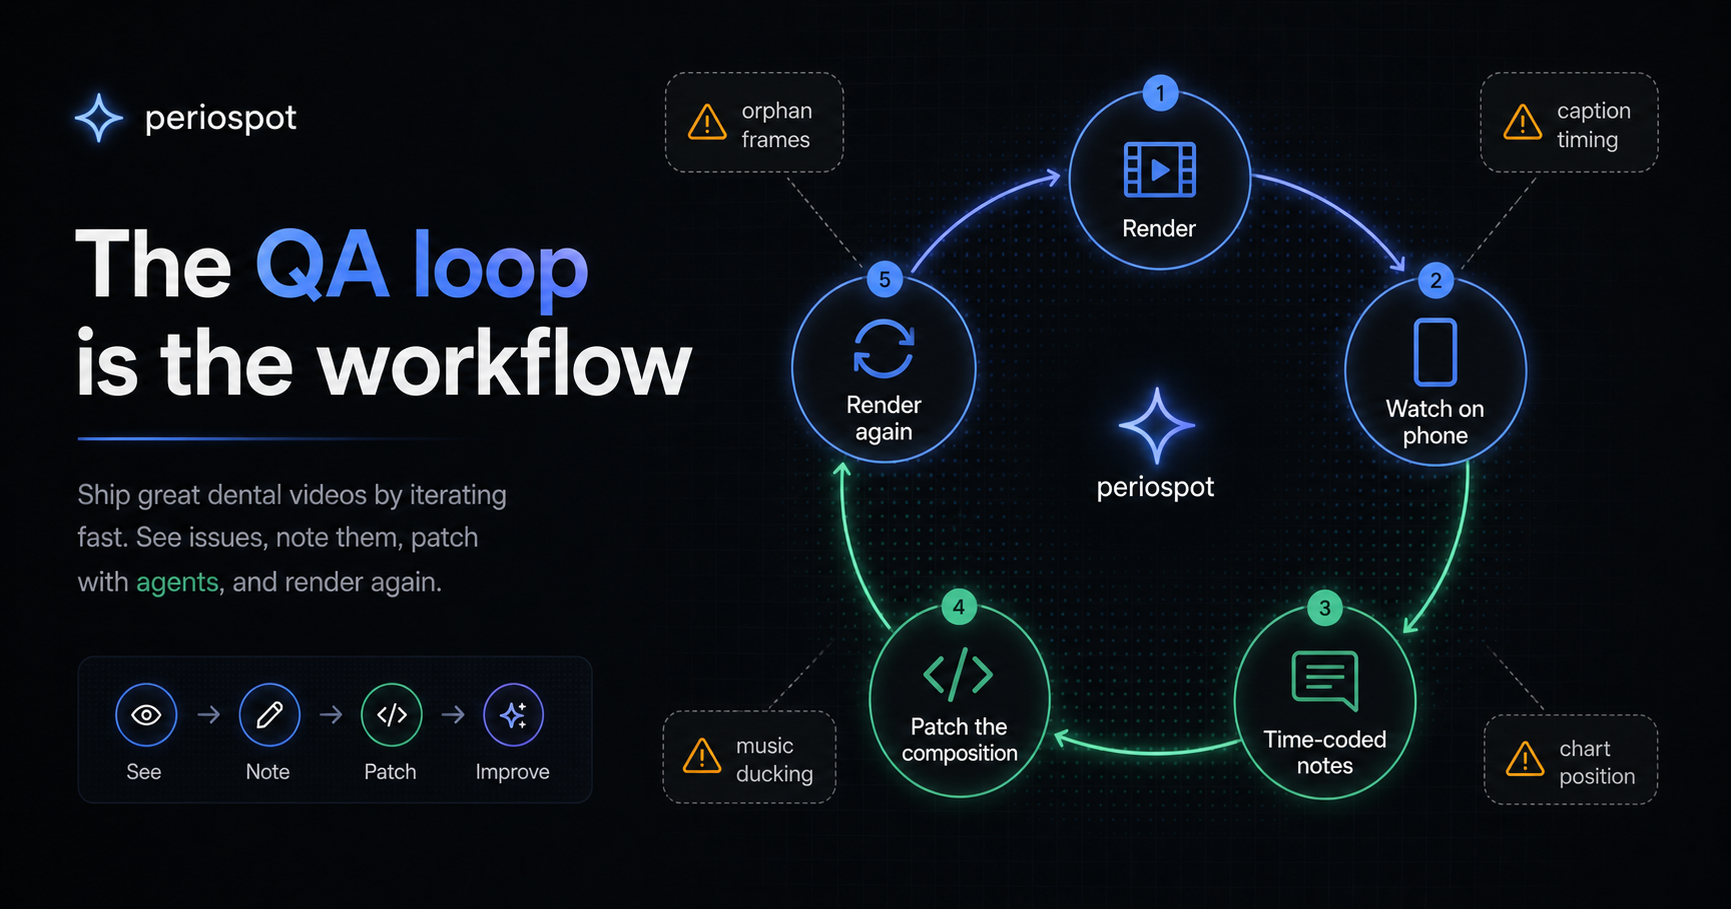
A useful agent workflow looks like this:
- Render a draft.
- Watch it like an editor, not like a programmer.
- Write time-coded notes: "0:48 remove the orphan motion-system frame" or "0:40 center the chart; the middle of the frame is empty."
- Ask the agent to patch only those issues.
- Render again.
The agent is fast, but it does not have taste. You are still the director.
My quality checklist before publishing
For a dental education video, I would not publish until these are true:
- The clinical claim is correct and not over-specific.
- The chart is labeled as schematic when it is schematic.
- The generated biology looks plausible enough for patient education, but not like a histology claim.
- Captions are actually karaoke-timed, not just pasted text.
- The speaker's voice is clean and louder than the music.
- The music rises only when there is space for it.
- Every logo or graphic entrance has a small sound cue, but not the same cue every time.
- No false takes, preparation moments or long silences remain.
- No B-roll flashes for less than a meaningful beat.
- The final sentence is not cut.
- The render is 1080x1920, with audio, and has been watched on a phone.
That last point matters. A vertical video can look acceptable on a desktop preview and still fail on the phone where people will actually watch it.
The honest truth
This is not a replacement for clinical judgment. It is not even a replacement for taste.
It is a way to make the mechanical part of video production editable by language. That is already a big shift. A clinician can now say, "move the chart down, cut the silence, bring my face back, make the captions karaoke, use the generated BIC sequence, duck the music under my voice," and the agent can make the change in code.
But if you do not know what osseointegration is, you can still make a beautiful wrong video. In dentistry, that is not progress.
The best use of this workflow is not to let AI invent the lesson. It is to help a clinician package a lesson they already understand.
What I would download or set up first
If you want to try this, I would start with the smallest possible setup:
- A Remotion project for the vertical composition.
- The HyperFrames repository or prompt guide as a reference for agent-friendly video instructions.
- A folder with your source assets: voice recording, talking-head clip, clinical article, chart references, logos and generated images.
- API keys for the services you are actually using, usually OpenAI for visual generation and ElevenLabs for audio.
- One QA document where every revision is time-coded.
Do not begin with a two-hour course or a full webinar. Begin with one clinical idea and one 60- to 90-second video.
A small life hack
If you want to try this and you do not know where to start, do not begin with a blank prompt.
Give Claude Code or Codex this article and say:
Read this article as the production specification. Help me create my first 60- to 90-second dental education video using the same workflow. First ask me for the source material, the clinical claim, the voice recording and the assets. Then create the project plan, the Remotion scenes, the caption plan and the QA checklist before rendering anything.That one move changes the conversation. The agent is no longer guessing what "make a good video" means. It has a workflow, a quality bar and a list of mistakes to avoid.
Why this matters for PerioSpot
PerioSpot has always been about translating complex periodontal and implant concepts into something clinicians can use and patients can understand.
This workflow is just another version of that mission. The science still comes first. The tools help us move faster, make the visual explanation clearer and create more versions without starting from zero every time.
For me, that is the interesting part: not "AI video" as a gimmick, but clinical storytelling that can finally keep up with the pace of the ideas.
Comments
0 totalLoading comments...
Previous
Connective Tissue Graft: The Biology Behind the Procedure
Next
Dental Video Marketing in 2026: How to Make Pro Videos Without a Video Editor
Related Articles

Dental Video Marketing in 2026: How to Make Pro Videos Without a Video Editor
8 min read
How I Grew 13,000 New Instagram Followers in Under 2 Weeks Using AI Videos (And the Exact Prompts I Used)
19 min read